Great writing, terrible reading

Apple has recently released Xcode 4—a major part of this release is an overhaul of the user interface. Change in your development environment is always a bit disruptive, but overall I think the move towards a single-window environment that adapts to different working modes is a good thing.

But this post is not to debate these changes to the programming environment. Rather, I’d like to discuss the new documentation viewer and how it has become unsuitable for both Mac and iOS development.

Apple’s technical documentation has always been top-notch: well written with just the right amount of technical detail. Unfortunately, the documentation viewer that we use to read this valuable information has been declining in ease of use over the past few releases.

It has gotten to the point where frustration with usability overshadows the excellent content. The best way to describe these annoyances is by example: I often get the feeling that the writers who create this prose don’t understand how we use it. Hopefully, this critique will help Apple create a viewer that’s just as good as the information it holds.

A corrupt index

A developer coming from Xcode 3 will have a terrible first experience with the new documentation viewer. Any previously installed documentation sets are incompatible with Xcode 4. Methods that you know exist just don’t show up:
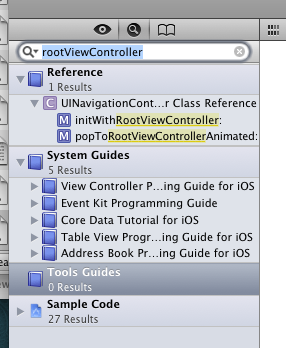
Search in vain

There are also problems with the Jump Bar navigation stack not being recorded correctly and the browsing history being unavailable (the back button isn’t available when it should be.)

Presumably, there is a corrupt or incompatible index. The workaround is to delete and re-install the documentation set, but this is far from obvious.

Since I currently have three different versions of Xcode installed (and will continue to use Xcode 3 for the foreseeable future), I’m wondering if this corrupted/incompatible index will continue to be a problem. Fingers are crossed, but at least now we know what to fix if it breaks.

Popup hell

When you hold down the option key and click on a symbol in Xcode, you see the following window:
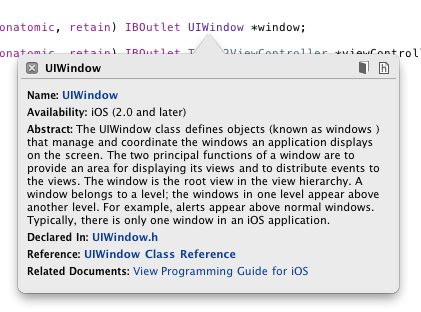
Popup hell

For novices, this window has some utility—it provides a simple way for them to dig into what is probably unfamiliar territory (“What’s a UIWindow anyway?”).

The problem is that this window becomes a roadblock for experienced developers. We know damn well what a UIWindow is: we need to dig into the details of this important class. Maybe we want to know more about the rootViewController instance or look at some of the methods in UIResponder (because we know it inherits from that.) This helpful popup quickly becomes a hindrance.

In previous versions of Xcode, holding down the shift key along with the option key gave you a quick way to avoid this popup help. In Xcode 4, that shortcut is gone.

Considering that this feature can get in the way hundreds of times per day, this is truly popup hell.

rdar://9149588

No methods

Once you get the documentation index in working order and actually make it past the popup help, your next hurdle is to locate the information you seek. Let’s say we’re looking for some background on what happens when a new -rootViewController instance is assigned. We’ve got the page of documentation, but there aren’t any controls to show the methods for the UIWindow class:

No methods

Besides being a pain in the butt, this is wholly inconsistent with the behavior in the code editor:

Methods

(Note that typing “ro” is enough to select “rootViewController” in the code editor’s popup menu. That, followed by the enter key gets you to the code of interest.)

From a developer’s point-of-view, the header files and the documentation page go hand-in-hand. Make the UI affordances the same and we don’t have to think about whether we’re looking at code or the words that describe it.

With a little more digging, you’ll find that you can get to the rootViewController documentation with the Jump Bar. Unfortunately, it takes a lot more effort than in the code editor: you have to click on the class name, and then move the mouse until the subcategories appear. Choose “Instance Methods” and wonder why rootViewController isn’t there. Then move the mouse back and try Properties.

Bingo (but you don’t feel like a winner.) And forget about navigating these lists quickly and easily with the keyboard as you can with the code editor.

rdar://9149638

Unmanaged complexity

Our final navigation problem is reading chapter-based documentation. These are the crown jewels of Apple’s developer documentation. Titles like The Objective-C Programming Language, iPhone Human Interface Guidelines, and the Cocoa Fundamentals Guide are essential reading for all developers, both beginner and advanced. As I began learning about Xcode 4, of course I turned to the excellent User Guide.

These guides typically span many chapters when sections that cover a wide range of topics. And this is how you navigate through those chapters:
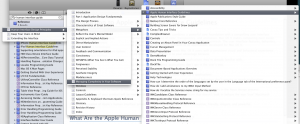
Unmanaged complexity

Managing complexity, indeed.

The pity here is that someone in developer documentation has forgotten that a Table of Contents tells a much more important story than the individual chapters. A roadmap lets you visit the destinations efficiently.

To get an idea of how painful this is, try finding the recommended Singleton implementation in the Cocoa Fundamentals Guide using the Jump Bar. I’ll wait. (For extra credit, count how many menus you open in the process.)

Of course the documentation viewer has a search function, but even that’s a bit laborious because you have to click on a lot of disclosure triangles to find the right item in the results. Why aren’t the relevant results opened automatically? (And, yes, option clicking the disclosure triangle can be used to achieve this goal, but the question still remains: why isn’t this the default action?)

Updated March 29th, 2011: Matt Neuburg has discovered that for some documents, search results don’t show where your term occurs; you’re shown a higher-level page, but not the actual page.

The root of the problem here and with the method names in the class documentation, is that a deep hierarchy is too hard to navigate. Present the information in a single list and it becomes much more useful. Imagine how bad the code editor navigation would be if it presented a hierarchy based upon classes, properties and methods. It’s flattened into a single menu for a reason: and those same reasons exist in the documentation viewer.

The Jump Bar is a great addition to Xcode, but it’s true power lies in having a predictable end point. With code, that end point is a function, property or method. With documentation, that end point is elusive: it varies depending both with the type and the structure of the documentation you’re viewing. And that’s a real problem when you’re looking for something.

rdar://9149683

ePub, not PDF

While we’re on the subject of this long-form documentation, why isn’t more of it available in the ePub format used by iBooks? It’s pretty safe to assume a huge majority of Mac and iOS developers have an iPad and like to use it for technical documentation. Searching for “Apple Developer Publications” in iBooks results in only six books. That’s a great start, but there is still a lot of documentation available only in PDF.

PDF is, of course, an option for iBooks. But turns out to be unsuitable because there is no back button. If you click a link in the PDF file, it’s a one way proposition. And for technical documentation, that’s a deal killer.

ePub also has the advantage of better font control and image viewing.

rdar://9149845

Some good news

Fortunately, it’s not all bad news. This new version of the documentation viewer seems to keep track of its place on the page much more reliably than in the past. Gone are the days where hitting the back button put you back as the top of the page (instead of the method or property you were looking at previously.)

This one simple fix will save developers a huge amount of time. Thanks!

Ingredients

This situation with the Xcode document viewer has gotten so bad two developers, Alex Gordon and Jean-Nicolas Jolivet, have taken matters into their own hands. This ultimate workaround is an application called Ingredients.

Ingredients parses the HTML files used by Apple’s own viewer and persists the information with Core Data. The result is quick access to the documentation you need with advanced options to filter and sort to your liking. Recent work by Troy Gaul added an item to the Services menu so a keyboard shortcut can be created to view the selected symbol from any text editor (include Xcode.)

If the problems mentioned above affect you adversely, take a look at this alternative documentation viewer. And please take a moment and file duplicate bug reports using the Radar links above. This is the best way to give Apple an idea of how much this is affecting our daily work. Thanks!

Updated March 22nd, 2011: The developers of Ingredients are now accepting donations.

Brain farts

What happened?

In spite of plenty of advance warning from Twitter, we got caught by the Twitpocalypse bug.

For the 2.0.1 release, we had tested our software extensively. I actually wrote an emulation layer on top of the code that reads data from Twitter that added a large number to every ID read from Twitter. This testing uncovered several bugs which were fixed and incorporated into the MGTwitterEngine open source code.

Unfortunately, this testing didn’t take into account that the library we use to parse the data (YAJL) includes a range check that ensures signed values, which are allowed by the JSON specification, will fit into 32-bit storage. The “YAJL Error 3” is that library telling us that the range check failed.

In hindsight, I should have fed the parser some large unsigned integers. In the wonderful world of software development, we call this a brain fart.

How did we respond?

Unfortunately, the Twitpocalypse occurred on Friday evening, just as my wife and I were heading out for a high school graduation. I quickly shot off an email to Twitter asking a few questions (I had mistakenly thought that there were problems with data being returned by an authenticated connection.)

After a couple of hours of iPhone email and SMS, it was clear that we were going to need do a new release. We had a critical bug that affected thousands of users. And our fear was this submission would take longer than normal: many developers are submitting 3.0 updates.

Life officially sucked at this point, and the graduation ceremony was memorable for all the wrong reasons.

After getting a few hours of fitful rest, I opened up Xcode on Saturday morning and started looking for the problem. It took just a few minutes to find the bug and another few minutes to fix it. Our concern at this point was getting the update to users.

Apple saves the day

In spite of it being the middle of weekend after a busy week at WWDC, we were able to get in touch with Apple Developer Relations. Our contact was able to expedite the approval of the application.

To say that this was a relief would be the understatement of the century. The update for the free version started showing up in iTunes on Sunday evening. The paid version was updated on Tuesday morning.

What can we learn from this?

Developers are human. We make mistakes. It’s interesting to note that Loren Brichter and Buzz Anderson, fellow developers whose skills I hold in high regard, were also affected by the Twitpocalypse. It really does happen to the best of us.

It’s also interesting to see that Loren and Buzz reacted in the same way I did: by fixing the problem ASAP. In Loren’s case, that meant finding a hotel with WiFi in order to distribute his update. Buzz released a new beta in a matter of hours.

In my experience, these brain farts are problems with easy fixes. It’s something like checking for invalid bounds, getting a Boolean state wrong, or something else of that nature. It’s not a complex problem: it’s an oversight.

The problem, therefore, is not how fast we can react to fixing critical bugs, but how fast the App Store reviewers can react with an approval.

As a device that’s constantly connected to the Internet, the iPhone taps into a stream of data that is unpredictable. Data in “the cloud” can change at any time, and web applications naturally adapt to these changes with a quick deployment strategies. Those of us who are building client applications on top of this network infrastructure need the ability to adapt quickly, too.

Security issues are another area where a quick response is a requirement, not a luxury. If I discover something that puts a user’s private data at risk, it’s my responsibility to fix the problem as quickly as possible. Time spent in a review queue is time spent being exposed to a flaw.

At the same time, we shouldn’t blame Apple for these delays in reviewing applications. In the year that they have been selling our products, the App Store has been more successful than anyone imagined. It’s clear to me that reviewers and others involved in the approval process are overwhelmed by this success.

How can we fix it?

Fortunately, I think there’s a simple way to solve this problem for all developers selling products on the App Store. The inspiration for this solution will be obvious to anyone who’s used Apple’s Developer Technical Support (DTS.)

When you purchase an ADC membership, you are given a number of “incidents”. These DTS incidents can be used when you have a problem that can’t be solved through documentation, support forums or hours and hours of debugging. It’s for the hard stuff, and usually involves getting an engineer at Apple involved to understand and fix the issue.

As a developer, I’m very careful to use these incidents wisely: they are a last resort. There are some years where I don’t use them at all, those are the good years.

A similar system could be put in place for critical bug fixes on the App Store. If every developer was given one or two “prioritized reviews,” it would act as insurance for the brain farts. You’d have a way to raise a flag and say “I need special attention for a critical bug.”

If another developer has a critical bug, I have no problem with my review process for a feature release taking a little longer. And since prioritized reviews would be a scarce resource, they won’t be open for abuse because developers will think twice before using them.

Because it’s not a matter of if you have a brain fart that leads to a critical bug, it’s a matter of when.

Front Row To Go

Everyone and his brother has a prediction about Apple and the mythical “netbook.” This is mine.

Before I get into the actual prediction, let me say that I’ve come to this conclusion by looking at Apple as a business, not as a supplier of shiny gadgets for our technolust. As much as we love the things they make, their goal as a corporation is to make the stockholder’s happy. They do that by selling lots of products. We’re just a means to that end.

A lot of the speculation regarding the netbook says that it provides functionality in the price gap between a $200 iPhone and a $1000 MacBook. While that’s true, it misses the point.

Apple would rather sell you another device in addition to the ones they already sell. They’re not interested in cutting into (presumably healthy) MacBook sales with a netbook. Likewise, selling a bigger touch device could cut into iPhone sales: keep your crappy cell phone and buy the netbook to throw in your purse or backpack.

One of the things that saved Apple was a simplified product line based around professional and consumer uses. Does it really make sense to have more than one consumer-level device for laptop computing? The MacBook already kicks ass in that department: having another device in that category just muddies the water.

But what if there was a device that could work in conjunction with your other Apple products? Something that extended their capabilities. Something that made each product better for a few hundred dollars.

Apple and their shareholders would love this: you’d buy the iPhone and the “netbook”. And eventually the MacBook. And maybe an Apple TV. And probably an iPod, too.

So what are some of the problems with the current hardware lineup?

  • iPhone / iPod touch – Small screen, small keyboard.
  • Mac – No touch screen, running Front Row prevents using your Mac for other things.
  • Apple TV – crappy remote, no keyboard.
  • iPod – Very small screen with no touch screen or keyboard.

So what kind of product could fill in these gaps? I call it “Front Row To Go.” Think of it as a second screen for the current hardware. Something that could:

  • Display photos on a larger screen than on the iPhones and iPods. It would also be effective as an adjunct to iPhoto on the desktop: Microsoft’s Surface prototype shows how effective it is to display pictures on a horizontal surface that can be manipulated by multiple viewers.
  • Provide a touch screen keyboard for the iPhone and Apple TV: a better input mechanism than hunting and pecking on chiclets. (Maybe this is the reason Bluetooth keyboards aren’t available for the iPhone.)
  • Show movies on a larger screen: anyone who’s taken a transoceanic flight knows that looking at the iPhone/iPod screen for more than a couple hours can be quite tiresome. An added benefit is that the player’s battery wouldn’t be consumed by the display’s power needs.
  • Provide touch input to desktop applications. Multi-touch is never going to happen on a vertically oriented display, so make a separate device that works horizontally. An obvious benefit to developers is that they don’t have to rewrite code: if it makes sense, multi-touch can be added to enhance current applications.

As with all other Apple products, Front Row To Go could obviously work as a standalone device. Sync your content onto the device and take it with you: no more dragging a laptop to a family reunion just because Aunt Bessie can’t see the tiny photos on the iPhone. Get your bookmarks and feeds from the Mac and surf the web using Front Row To Go’s version of Safari while you’re listening to music or watching TV.

As far as how these features would be implemented, that’s anyone’s guess. There might be an API for developers, or maybe it’s a closed system. The device might be able to play iPhone games or run multiple iPhone applications at once (much like the current Dashboard works in Mac OS X.) With a common base of OS X running throughout the product line, pretty much anything is possible.

And that gets to the real point of this essay: think about what Apple has learned from the halo effect surrounding the iPod (and now the iPhone.) If you have any doubt that this effect is alive and well, drop into an Apple Store on any weekend and take a look around: plenty of customers who are happy with one product and looking at others.

In my opinion, these consumers are the ones that Apple will target with a “netbook,” not the ones that are jonesing for a sexy little machine that fills a perceived gap in the product range. I hope I’m right, because I’d love to be one of those customers lining up to buy Front Row To Go.

Bootstrap

A lot of people stumble upon this website because they’re looking for information about developing applications for the iPhone. If this is your first time here, welcome!

I have been developing applications for the iPhone since it was released (using both the Jailbreak and official SDK.) My company is currently selling several applications in iTunes. I also have many years of experience with the underlying technologies on the device (Cocoa, the predecessor to Cocoa Touch.) I’d like to share some of my experiences and give you some pointers that will help get you started.

The first thing you need to know is that learning how to develop applications for a mobile device isn’t easy. But it’s worth the effort, ask any seasoned iPhone developer about seeing their work run on the device for the first time: it’s fricken’ amazing.

Get a Feel for the Device

Some of you may want to target the web with your application. If this is the case, you’ll want to start looking at a series of articles I wrote for A List Apart: Put Your Content in My Pocket (Part 1 and Part 2.)

Even if you’re going to be writing a native application, knowing how to develop web pages for Mobile Safari will be helpful. A product information website and other ancillary information about your app will work best when your new customers can view it on their device.

Working with the web is also a good way to start understanding how a mobile device is so much different than a desktop. Using HTML and CSS can be an excellent way to begin thinking about your application design and doing prototypes—we’ve used this technique in many of our own products.

After getting a feel for the web capabilities of the iPhone and iPod touch, you’ll want to look around the Apple Developer Connection (ADC) site for more in-depth technical documentation for developing web applications.

Which leads to our next topic…

Buy a Mac

There’s no two ways about it. If you’re going to develop iPhone applications, you’re going to do it on a Mac. The whole toolchain is Mac-only: you can’t do it in Visual Studio or Eclipse or anything else that runs on Windows.

Don’t think that this is some evil plan by Apple to make you use a Mac. It’s no more nefarious than Microsoft requiring Mac developers to purchase Visual Studio in order to develop Windows versions of our products.

Buying a Mac can be an expensive proposition: if you’re just getting started and on a shoestring budget, here’s some advice on doing it on the cheap:

  1. Buy a used machine. A lot of perfectly good hardware can be found on Ebay. New models of the Mac Book Pro were recently introduced, so many people are selling hardware after they upgrade. This older hardware is perfectly fine for doing iPhone development: the apps you’re going to develop are small and compact and don’t need a lot of processor power to build and test.
  2. Buy a Mac mini. Even though you’re buying new hardware, you’ll save money because you’re supplying your own display, keyboard and other peripherals. If you’re like me, you have plenty of this stuff lying around.

If you’re having a hard time justifying the hardware expenditure, remember that you can run Windows or any other x86 based OS on this machine.

The only thing to keep in mind as you’re buying hardware: make sure that the Mac has an Intel processor. The development tools won’t run on the older PowerPC processors.

The good news is that once you buy the Mac, all the development tools are free. Think about all the money you spent buying Visual Studio and MSDN and you’ll feel much better about spending a thousand bucks for the hardware :-)

So how do you get all these free development tools? Read on…

Join Up and Download

There are two things you’ll need to do before you can start writing applications: sign up for ADC and register to become an iPhone developer.

Neither of these things costs money. Everything is free until you want to put your code onto the device. At that point, you’ll need to pay $99 to get a certificate that allows you to sign the binary and put it on the device.

The first step is to create an Apple ID; it’s an email address that you’ll use to access the developer site. You may already have one for your iTunes account. These pages guide you through the sign-up process.

Once you have an application that you want to test on a device and distribute on the App Store, you need to apply to the iPhone Developer Program.

After you have the keys to the ADC kingdom, there is a wealth of additional information available…

Sit Back and Watch Some Movies

Before you start diving into coding, I highly recommend spending a few hours watching the “Getting Started Videos” in the iPhone Dev Center.

(Note: if the links on that page are grayed out, it’s because you’re not logged in yet. Sign in using the Apple ID that you obtained above.)

As I said earlier, I came into iPhone development with a fairly extensive background in the technologies used on the device: even so, I learned a lot from these videos. Make sure you take advantage of this valuable resource.

And make sure you do it before rushing off and hacking on code…

Start Playing

If you’re like me, you’ll want to start playing around with code as soon as possible. The best way to do this is with the excellent sample code that Apple provides on its developer site.

(Note: Again, that link is behind a login, so you’ll need an Apple ID before you can download the samples.)

Since you’re new to iPhone development, it’s likely that you’ll have some problems going beyond a simple build and run of the projects you download. (If you’re having problems running the sample projects, make sure that you have “Simulator” selected in the drop-down menu at the top of the project window.)

When you start to get confused by Xcode or the syntax of Objective-C, you’ll want to move onto the next step…

(Note: I said “when”, not “if”. Trust me on this.)

Crack a Book or Two or Three

You’re lucky that there are a lot of great books about iPhone development available now. It’s a luxury that those of us who worked on iPhone apps during the NDA are very jealous of :-)

If you’re just starting out, I’d highly recommend Beginning iPhone Development: Exploring the iPhone SDK by Dave Mark and Jeff LaMarche. The best thing about this book is the step-by-step approach it takes to working with Xcode, Objective-C and the iPhone APIs. They’ll lead you through the basics and you’ll be building your own apps in no time at all.

As you get more comfortable with the tools and AppKit/UIKit frameworks, I’d recommend you take a look at Erica Sadun’s iPhone Developer’s Cookbook: Building Applications with the iPhone SDK. This book presumes a bit more knowledge about the SDK, but is a very handy reference both to the official and unofficial APIs. (Go ahead and play with the undocumented features, but do not use them in an application that you want to put on the App Store.) You may want to read my in-depth review of this book.

Since you’re going to be working with Cocoa Touch on the iPhone, you’ll also want to start thinking like a Cocoa programmer. Every great iPhone and Mac developer has nothing but wonderful things to say about Cocoa Programming for Mac OS X by Aaron Hillegass. Don’t be misled by the “for Mac OS X”—you’re going to be working with classes and design patterns that are identical on both platforms. You’ll also have a Mac that you’re using for development, so building the samples and test code isn’t a problem.

If you have previous development experience with C, C++ or Java, you’ll want to read this mailing list post by Erik Buck that enumerates some of the difficulties that you’ll have coming up to speed with Objective-C and Cocoa. Make sure to take some time and read the replies to that post: many of the people commenting on that post are fellow developers whose work I hold in high regard.

And while we’re talking about Erik’s writing: there are a lot of experienced Cocoa developers waiting for this book. You won’t need it for awhile, but you will need it.

As you’ve probably figured out by now, this whole learning process is going to take awhile. I’d also be remiss if I didn’t mention that there is a pretty steep learning curve. I’ve built products in assembly code, BASIC, C/C++ on Unix, X11, Win32, Java and a whole bunch of other technologies. Objective-C and Cocoa weren’t the easiest to pick up, but they’re definitely the ones that I plan on sticking with. Try not to get discouraged: once you “get it” developing with this language and framework is a joyous experience.

Other Resources

I’ve been coding long enough to remember a time when we didn’t have the Internet as a source of information. Thank God those days are behind us: here are some online resources that I use often:

  • cocoabuilder.com There are two mailing lists where other Cocoa developers and Apple engineers hang out: Cocoa-dev and MacOSX-dev. The archives for both of these lists can be searched using CocoaBuilder: extremely handy when you come up against a problem that someone else has already solved.
  • cocoadev.com A wiki that is maintained by the Cocoa developer community. This is the first place I look when I need to learn some new part of the framework. As an example, check out this entry about the string class.
  • cocoadevcentral.com A beautiful site maintained by Scott Stevenson. So many great tutorials and links to other sites and blogs that focus on Cocoa development. Spend some time exploring those links and you’ll learn a lot about our developer community.

Apple recently launched another great resource: Developer Forums. It’s currently in beta, but is still an excellent place to ask fellow developers questions about iPhone SDK topics.

But wait, there’s more!

You’ll find a lot of iPhone content on this site. Here’s proof.

To save you some time, here are some quick links to some of the more popular essays on this site:

Memory management issues (part 1.)

Memory management issues (part 2.)

How to run a beta test.

Extracting information from crash reports.

Final release testing.

What to expect on release day.

Debugging with customer backups.

How to deal with expired certificates.

And, of course, source code for you to use in your own projects:

[REDACTED]

Fancy UILabels

Or just have fun with:

Lights Off

And if you aren’t already completely bored with me crapping on about the iPhone, there are videos.

Conclusion

I hope this information has been helpful and gotten you started in the wonderful world of iPhone development. Don’t forget to subscribe to this site’s RSS feed since I have a lot more I’d like to write about :-)

Good luck!

Raising prices

Many of you are starting to realize that a ringtone price point does not sustain a business. I’m with you.

Lately, I’ve been thinking about ways to make higher prices more palatable to customers. Several discussions at Macworld kicked off these thoughts, and a recent tweet by Justin Williams made me realize that a lot of you could benefit from these ideas. Hopefully, this short essay will help us all make it through the App Store gold rush.

The first thing to do is think about a “Lite” or ad-supported version of your application. Let customers find out how great your work is by giving them a free copy.

Based on our dealings with Apple Developer Relations, there are two basic rules you need to follow when making a Lite version of your product:

  1. The product must be fully functional. The application must stand on its own and be useful.
  2. The user should not be inundated with “up-sell” reminders. Showing BUY NOW every 5 minutes is the quickest way I know to get rejected by the App Store.

The hard part, of course, is how to limit functionality. For many games, it’s pretty easy: you just limit the number of levels the user gets to play for free. A similar technique can be used for applications that track data by limiting the number of records that can be added.

But there are many applications that don’t fall into these neat categories. One such application is our own Frenzic. Due to the game’s open-ended nature, there’s not much we can do to set “levels.” Until there is some kind of demo mechanism on the App Store, we’re stuck with advertising, good reviews and word-of-mouth.

One interesting case is James Thomson’s PCalc application. I love this calculator, and found his analysis of what to keep and what to remove very interesting. You should note that this effort paid off: his sales doubled as a result of the Lite version.

Free applications that are supported by ads are also a viable alternative. We’ve seen a steady stream of sales with Twitterrific because customers that use the free version know exactly what they are going to get for their $10. The main consideration with this approach is thoughtful integration of the ads into the user’s activities. Annoying a user with ads is a good way to get deleted from the home screen.

Using this model, some people will never buy your application. And that’s OK, and maybe even better, because you’ll make your money back over the long term. I was not surprised when Shazam started showing ads. They spent a lot of time and money developing their application and back-end infrastructure. When millions of people are using your product and seeing ads every day, that revenue can be substantial and easily pay for development costs.

Another thing I’ve noticed is that iPhone applications that have a tie-in to a Mac desktop product can command a higher price. If you have group of users who already love what you do on the desktop, selling those users mobile functionality is easy. Take a look at Things and OmniFocus as examples: the desktop versions of these apps sell for $50 and $80, respectively.

The iPhone version of these products sell for $10 and $20. From a customer’s point-of-view, that’s not 10 times more expensive than the typical ringtone app. Instead, it’s a small price to pay for mobile access to their desktop data. Conceptually, the 20-25% fee is just another upgrade cost.

Finally, you should take a look at vertical markets. I love the prices for Medical applications in the App Store. There are a lot of apps with price tags over $10 (some are even over $100.) Again, the customer for these apps is not thinking so much about cost, but rather of the value provided.

When businesses start to see the capabilities that an iPhone applications gives a distributed workforce, vertical markets could become quite lucrative. You may only have hundreds or thousands of customers, but if you’re earning hundreds of dollars from each of them, that’s a viable business.

In closing, I’ll pass on a small reminder that an Apple employee gave me during Macworld: the App Store has only been live for a little over six months. Last month’s 25 year anniversary of the Mac should also remind us that this new market for our products is still in its infancy. Yes, it’s a wild ride at the moment, but if you think about your costs, customers and revenue streams, I think you’ll enjoy a very long journey.