It’s quite possible that I’ve written the easiest, but still useful, watchOS app.
Category: Development
When I first started exploring the brave new world of Cocoa and Unix running on a Mac, I had no idea that the code I was writing would be something I relied on 14 years later. Sometimes you scratch an itch that never goes away.
While I welcomed the introduction of System Integrity Protection (aka “rootless”) at WWDC 2015, I also thought that it would be the end of iPulse. Luckily, an Apple engineer responded to a Radar and pointed me at libproc.
The rest, they say, is history. And by history I mean a couple of months work overhauling an ancient codebase :-)
With the help of Talos Tsui, all the icons and graphics now follow the latest user interface guidelines and are Retina quality. The app no longer looks like it’s over a decade old!
I know there are a lot of fellow developers out there who love iPulse as much as I do (and boy, did I hear from all of you when it stopped working in El Capitan!) You’ll be happy to know that you can download the updated version directly from the Mac App Store. This is also the app’s first paid upgrade and it’s only $10.
There’s more information and a screenshot on the Iconfactory blog.
As a developer, sometimes you get lucky and are able to predict the future.
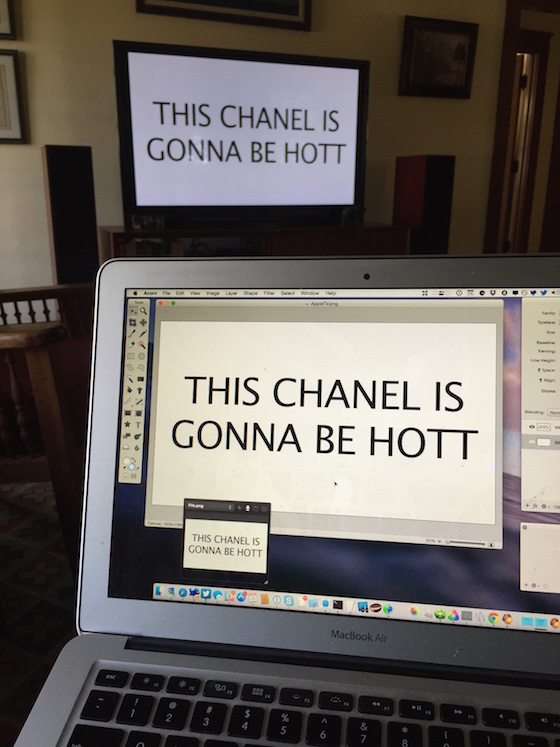
I wrote a quick tutorial on the Iconfactory blog about how to use xScope to preview your work on an Apple TV.
If you’re a web developer and you don’t have the Network Link Conditioner installed, you’re doing your visitors a disservice.
This tool, originally created so that iOS developers could test native apps on EDGE networks without leaving the comfort of their office, should be an essential part of your development toolchain. You’ll need to register for a free Apple developer account to download the tool, but that shouldn’t stop you.
It’s likely that you’re working on a fast network with low latency. This will skew your perception of how your site performs for a majority of the people who use your site. When you slow your Mac network down using the link conditioner, huge assets won’t load in an instant and you’ll start to feel someone else’s pain. Now try going an entire day using hotel Wi-Fi…
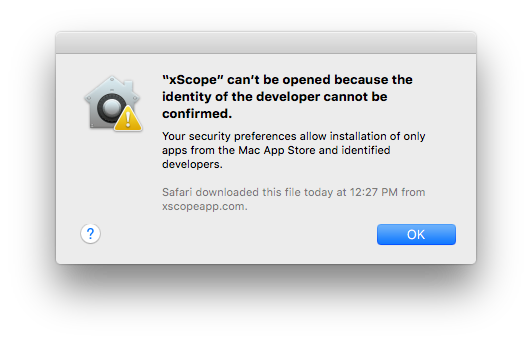
After releasing a update for xScope with fixes for El Capitan, I launched the app on a fresh install of the OS and was greeted by this dialog:
I had tested the build on Yosemite, and it passed without any problems:
$ spctl -a -v ~/Downloads/xScope.app
/Users/craig/Downloads/xScope.app: accepted
source=Developer ID
Clearly there is something new with Gatekeeper in El Capitan. As the author of a tool used by so many early adopters, I often get the job of figuring out what’s new with code signing. Lucky me :-)
I quickly filed a Radar about the problem. This led to feedback from Apple that helped me understand why Gatekeeper rejected my app. The change in El Capitan has the potential to affect a lot of developers (including the big guys), so it’s time to share what I learned.
(If you’re one of those people that claims that “Radar never works”, then that last paragraph just proved you wrong.)
When I ran the spctl tool on El Capitan, I saw an “obsolete resource envelope” error:
$ spctl -a -v --raw xScope.app
xScope.app: rejected
<?xml version="1.0" encoding="UTF-8"?>
<!DOCTYPE plist PUBLIC "-//Apple//DTD PLIST 1.0//EN" "http://www.apple.com/DTDs/PropertyList-1.0.dtd">
<plist version="1.0">
<dict>
	<key>assessment:authority</key>
	<dict>
		<key>assessment:authority:source</key>
		<string>obsolete resource envelope</string>
		<key>assessment:authority:weak</key>
		<true/>
	</dict>
	<key>assessment:cserror</key>
	<integer>-67003</integer>
	<key>assessment:remote</key>
	<true/>
	<key>assessment:verdict</key>
	<false/>
</dict>
</plist>
This is a sign that there’s a problem with the code signature. In the past, this has been caused by a change to the signature version number (from 1 to 2). In El Capitan, the cause is more stringent code signature checks.
(Note that I also used the --raw option. According to the man page, “This is useful … to access newly invented assessment aspects that spctl does not yet know about.”)
The functional equivalent to spctl -a is the following codesign command. The --deep option checks any embedded code (such as the Sparkle framework.) Note that --strict is a new option in El Capitan (so new, that it’s not documented yet):
$ codesign --verbose=4 --deep --strict xScope.app
--prepared:/Users/craig/Downloads/xScope.app/Contents/Frameworks/Sparkle.framework/Versions/Current/.
xScope.app: unknown error -67003=fffffffffffefa45
In subcomponent: /Users/craig/Downloads/xScope.app/Contents/Frameworks/Sparkle.framework
file modified: …/Sparkle.framework/Versions/Current/Resources/fr.lproj/fr.lproj
file modified: …/Sparkle.framework/Versions/Current/Resources/fr_CA.lproj
Gatekeeper is rejecting xScope because it thinks some files in Sparkle have been modified after the code signature was generated. This seemed unlikely since the frameworks are code signed during the copy build phase and our automated build process creates a ZIP archive just after the app bundle is created.
I dug around in the application package contents and saw the following:
$ ls -ls Sparkle.framework/Versions/Current/Resources/fr_CA.lproj
8 lrwxr-xr-x@ 1 craig  staff  84 Jul 22 12:31 Sparkle.framework/Versions/Current/Resources/fr_CA.lproj
  -> /Users/andym/Development/Build Products/Release/Sparkle.framework/Resources/fr.lproj
$ ls -ls Sparkle.framework/Versions/Current/Resources/fr.lproj/fr.lproj
8 lrwxr-xr-x@ 1 craig  staff  84 Jul 22 12:31 Sparkle.framework/Versions/Current/Resources/fr.lproj/fr.lproj
  -> /Users/andym/Development/Build Products/Release/Sparkle.framework/Resources/fr.lproj
Well, well, well.
Gatekeeper rejected the app because I’m using Sparkle 1.5b6. The framework has symlinks to paths on a Mac that I doubt Andy Matuschak uses anymore. That’s completely reasonable: those symlinks could just as easily point to something a lot more damaging than a non-existent directory.
The --strict option currently checks the validity of symlinks. You can point a symlink at a path in your own application package, /System or /Library, but nowhere else. The code signing rules also allow language translations to be removed, but if they are present they must be unmodified.
The quick fix for this problem was to remove the invalid symlinks; a new build passes the same check without any problems:
$ codesign --verbose=4 --deep --strict xScope.app
--prepared:/Users/craig/Downloads/xScope.app/Contents/Frameworks/Sparkle.framework/Versions/Current/.
--validated:/Users/craig/Downloads/xScope.app/Contents/Frameworks/Sparkle.framework/Versions/Current/.
--prepared:/Users/craig/Downloads/xScope.app/Contents/Frameworks/YAML.framework/Versions/Current/.
--validated:/Users/craig/Downloads/xScope.app/Contents/Frameworks/YAML.framework/Versions/Current/.
xScope.app: valid on disk
xScope.app: satisfies its Designated Requirement
A better solution is to update to a newer version of Sparkle. The project was dormant from 2008 to 2014, so many of us didn’t realize that the team behind the project is doing regular updates again.
Many of your customers will be downloading and running your app on the El Capitan public beta: you should do the codesign --deep --strict check on any new releases to avoid customer support issues. It’s also likely that a similar check will be performed for you when the Mac App Store eventually allows submissions for 10.11.
And let’s get together again when 10.12 is released! In the meantime, enjoy this new release of xScope on Apple’s new release of OS X.