Trendy

If you’re reading my essays, it’s likely that you’re selling some kind of software on the Internet. (Or soon will be.)

To be successful at this endeavor, you need to monitor your sales and plan development around the revenue. Ask anyone who’s had success with a software product, and I can guarantee you that they have some kind of metric that tells them how well they are doing.

What I’d like to do today is share one of my favorite methods. But before I do, let me share some advice that will help you understand why this tracking scheme is so effective.

If you’ve released a product, you no doubt have witnessed the “first day spike.” It’s one of the great things about doing a release: you find that people really do love your work.

But there can be a problem. Typically, that initial spike is followed by an exponential curve: every month you’re making half as much money. And even though your income is less and less each month, the support load from existing and new customers stays fairly constant. You’re working just as hard, but earning less.

So how do you work around this? As you would in any other business: by planning ahead.

As software developers we often fall into the “just one more feature” trap. We want a 1.0 release to be awesome, and that one more thing will only take a day or two, and people will love it, so why not?

Because that awesome feature could be a very good thing to generate buzz and sales for a 1.1 or a 1.2 release. And by not “doing it all” in the first release, you get your product to market faster. You’ll be making money while you implement that cool new feature.

And holding back can have another advantage: you might find that your users want something different than what you had planned. Their input can often change your idea, so don’t waste time doing something without feedback.

So when do you know that it’s a good time to do a 1.1 release? A general rule of thumb is 30-90 days after your 1.0 release. On the day you release your 1.0, you should have some code already in the works for the 1.1 release. Give yourself a head start on the next release, because you’ll find those first 30-90 days are consumed by customer support and go by very quickly.

(I can also guarantee that you’ll have a 1.0.1 release because of some stupid little bug you overlooked. So make sure you plan ahead for that, too.)

With all this in mind, I present a simple way to visualize your release cycles by graphing trends of averaged daily sales:

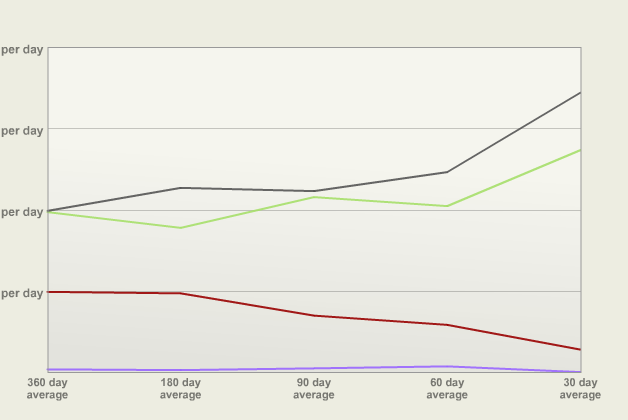
The graph shows four hypothetical products and their sales. The Y axis shows how much the product earned. The X axis shows increasingly short time intervals. To plot each Y value, you just take the total amount sold in that period and divide it by the number of days. The intervals were chosen because they’re nice approximations of monthly, bi-monthly, quarterly, bi-yearly and yearly cycles.

Let’s say the Y grid lines are at $10, $20, $30 and $40 earned per day. The red product has sold about $2.50 per day over the past month, and about $10 per day over the past year. It’s a product that’s definitely in need of a version bump. An update should push it over $10 per day in the 30 day interval.

The gray product shows how a new release looks. Instead of seeing a spike, you’ll see the averages for all intervals go up (with the most change at the most recent intervals, of course.) You’ll also see the most recent averages go up as a result of ads, reviews and other good PR. As time goes on, the 30 day average will eventually drop. When it gets below the 60 or 90 day average, that’s a good time to do a release.

The goal is to end up with a product like the green one. For the most part, it trends upwards. You’re doing things right.

Finally, this graph also shows products that you shouldn’t spend time on. The lavender product isn’t performing as well as the others. Your time is better spent on things that are going to generate more revenue.

In case you’re wondering how I generated these graphs, it’s proprietary Ruby on Rails code that reads our financials and feeds them to XML/SWF Charts. The information in these graphs will change frequently: you’ll want to find a way to automate the collection and processing of your own sales data.

I’ve been talking with Dylan Bruzenak about incorporating this trend graph into AppViz. Hopefully we’ll see it in a future release—make sure to let him know if you’d find it helpful. (And if you’re not already using AppViz to track your iTunes sales, pull your fricken’ head out and start using the trial version.)

Who knew that accounting could be so trendy?

Sharing iPhone projects

The latest version of Xcode has a “feature” that prevents you from specifying a wildcard name for the Code Signing Identity. (This feature does make it easier for new developers or people working alone, so I’m not going to write a Radar for this behavior.)

When you have multiple people working on an iPhone project, this behavior is very annoying because every developer has to change the Code Signing Identity before they can run the latest version on the device. Here’s a typical scenario:

  1. I set the Code Signing Identity to “iPhone Developer: Craig Hockenberry” and do my device build. Everything is wonderful and I check in a new SekretApp.xcodeproj/project.pbxproj.
  2. I add some cool new features to SekretApp and I want Anthony Piraino to try them out. Anthony updates his working copy to the latest version.
  3. Anthony has to change the Code Signing Identity to “iPhone Developer: Anthony Piraino” so that he can do the device build. He does, and everything is wonderful.
  4. Anthony then adds some new files to the project. He checks in a new SekretApp.xcodeproj/project.pbxproj as a result of this change.
  5. I need these new files, so I get the latest version of the project. Unfortunately, this latest version has Anthony’s Code Signing Identity in it. Everything is not wonderful.
  6. Lather, rinse, repeat.
It gets even more fun when you have merge conflicts. The solution to this problem is to get rid of the individual developer names in the project.pbxproj file.

Before you begin, make sure that you’ve closed the Xcode project you’re going to be updating. You are going to be modifying files used directly by Xcode, so things can get screwed up if you make changes while the project is alive.

The first step is to locate SekretApp.xcodeproj in the Finder and right click on the file. Select “Show Package Contents” to reveal the project.pbxproj file.

Now, open project.pbxproj with your favorite text editor and look for the Code Signing Identity. It will look something like this:

CODE_SIGN_IDENTITY = "iPhone Developer: Craig Hockenberry";
"CODE_SIGN_IDENTITY[sdk=iphoneos*]" = "iPhone Developer: Craig Hockenberry";

Change the identity to look like this:

CODE_SIGN_IDENTITY = "";
"CODE_SIGN_IDENTITY[sdk=iphoneos*]" = "iPhone Developer";

You also need to delete the embedded provisioning profiles. These are normally located a few lines below the CODE_SIGNING_IDENTITY:

PROVISIONING_PROFILE = "DEADBEEF-1337-FACE-F00D-EA7A7BADCAFE";
"PROVISIONING_PROFILE[sdk=iphoneos*]" = "DEADBEEF-1337-FACE-F00D-EA7A7BADCAFE";

(And, yes, I felt very lucky the day I was assigned that GUID.)

Note that there will probably be more than one CODE_SIGNING_IDENTITY (depending on your Project and Target settings.) Make sure to search through the whole file.

After making these changes, re-open the project in Xcode, clean it, and do a device build. If you make it through the CodeSign build phase, you’re good to go. Now all you have to do is check in the new version of project.pbxproj.

This trick works because the underlying codesign utility searches your keychain for a match. From the SIGNING IDENTITIES section of the manual page:

To be used for code signing, a digital identity must be stored in a key-chain that is on the calling user’s keychain search list. The identity is located by searching all such keychains for a certificate whose subject contains the identity string given. If there are multiple matches, the invocation fails and no signing is performed.

Since you and everyone else on your team has only one certificate with the pattern “iPhone Developer”, this search works correctly and no one will need to update the project settings after they check out the latest version of project.pbxproj.

And everything will stay fricken’ wonderful.

Release day

Unless your Internet tubes are broken, you’re probably aware that we released Frenzic for the iPhone today. It’s been a long time coming, but we’re all very proud of what we’ve accomplished—and very grateful for the great feedback we’ve been getting. As always it’s been a great pleasure working with Wolfgang Ante on this game.

But let’s go beyond all of this self congratulation and look at some of the details about how to coordinate your App Store release.

The first trick is setting your release date. As we all know, there can be some long wait times in the iTunes Connect queue. Indications are that the approvals are getting quicker, but it’s still an indeterminate value. And not knowing when your application is going to appear in iTunes means that it’s hard to coordinate press releases, website updates and other things that are dependent on having an product for sale.

The way to handle this is surprisingly simple: when you add or update your application in iTunes Connect, set the release date far into the future. Then, once you’ve been approved, you can update the release date to coordinate with PR. We knew that Frenzic would show up in the App Store on November 19th. But we didn’t know exactly when.

So what does it mean to “show up” in the App Store? iTunes is a worldwide enterprise so the date and time on your wall clock doesn’t mean much. There are timezones that will see November 19th before you do. Since Frenzic stores scores with unique ids and timestamps on its website, we collected some data that provides insight on how applications are deployed on iTunes.

The first scores started coming in just before midnight GMT on the 19th. The bulk of the traffic was coming from throughout Europe, although there were also some scores from Australia. As far as the listing in iTunes is concerned, we first saw it appear in the UK store. It then appeared in Sweden and Austria: this was not an exhaustive search, merely one of convenience (we have employees in these countries.)

The most important thing, of course, is getting the iTunes link for the product. This link is used throughout the site on buy links. We needed this information before doing a website deployment.

Happily, the link that showed up in the UK is also the same one that’s used in the US (we assumed it would be, but were reluctant to a deploy until we were sure.) You can get the link by control-clicking on the product icon in iTunes and selecting “Copy iTunes Store URL”. The resulting URL looks something like this:

http://itunes.apple.com/WebObjects/MZStore.woa/wa/viewSoftware?id=296581959&mt=

Unfortuately, the only way to know this URL is by having it show up in iTunes. It would be nice to have this information ahead of time, and if you agree please submit a duplicate for ID# 6386452.

Updated November 19th, 2008: Thanks to Derek Del Conte there is a way to get the application ID. Just click on App Details in the “Manage Your Applications” list. The “Apple ID” can be used to create the link.

Another option for the purposes of deployment is to use a URL with the product name:

http://www.itunes.com/app/Frenzic

This format generates a redirect to the iTunes product URL. Unfortunately, it has been buggy in the past, so use it sparingly.

Finally, I’ll leave you with some eye candy. Wolfgang has posted some screenshots of Frenzic throughout its development:

  • The first prototype that we ever played on OS X. This is what got everyone at the Iconfactory hooked.
  • The game screen. The first pass at this used the same color scheme and contrast as the desktop version. That was a bad idea: put this screenshot in Photos and take it outside and you’ll see why.
  • The scores list. There is an art to making table views look nice. Both Wolfgang and I are lucky to work with some very talented designers :-)

So give Frenzic a try and if you like it as much as we do, tell your friends. Thanks!

Debugging with backups

If you’ve written an application for the iPhone, you’ll eventually encounter a customer problem that you can’t reproduce. Of course, you’ll want to get a copy of the customer’s data and preferences so you can replicate the environment they are working in. And then you’ll realize that it’s a total pain in the ass for both you and your customer.

iTunes creates backups every time a user syncs their device, but these backups are meant to be read by a machine, not a human. Your customer will have to wade through a bunch of GUIDs in the MobileSync/Backup folder: getting the right backup for your application has been a headache.

Fortunately, things got much better last week with the release of Pádraig Kennedy’s iPhone Backup Extractor. Pádraig is the author of the Python script some of us have been using to extract data from the .mdbackup files. Having this script in a GUI that the end user can run is a huge improvement.

You can instruct your customer to download the application, sync their device with iTunes and then have them select the latest backup and your application within that backup. The resulting output contains the documents and preferences in use by the application at the time it was synced and can easily be put in a ZIP archive.

Getting this information into your development environment is then just a matter of hacking around with the Simulator folder structure in ~/Library/Application Support/iPhone Simulator/User/Applications. The bug won’t stand a chance at this point :-)

Thankfully, Pádraig has made this a free application. Your customers won’t need to pay for anything before they help you out. You, on the other hand, won’t be using it directly but will still benefit immensely. Make sure to click on the Donate button so that this application will continue to see development and maintenance. I just did.

Plug-ins the Cocoa way

For many graphics applications, plug-ins are a way of life. This essay presents a method that minimizes the amount of work required to support different host applications, or even different versions of the same host. I used these techniques in our IconBuilder plug-in for Photoshop. These instructions have already helped one fellow developer; with the help of Google, hopefully there will be more.

My goal was to use Cocoa and NIB files produced by Interface Builder for driving the plug-in user interface. As I began to work on this project, I also realized that it was possible make the user interface independent of the underlying binary file formats: a CFM shim can load a Mach-O bundle.

Here are the steps to accomplish the task:

  1. Photoshop loads the plug-in which is built with Carbon.
  2. The Carbon plug-in searches for a Cocoa bundle in the plug-in’s resources with CFBundleGetBundleWithIdentifier and then loads it with CFBundleCreate.
  3. Once the bundle is loaded, I get a function pointer to the Cocoa code to execute using CFBundleGetFunctionPointerForName.
  4. After I’m in the Cocoa code, I create my own NSAutoreleasePool and then call NSApplicationLoad(). At this point, you can work with controller objects to get things setup and call [NSApp run] to get a run loop going.
  5. From this point on, I can use all the Cocoa and Foundation frameworks. Interface Builder NIB files work fine, too.

I use the Carbon code base with both Codewarrior and Xcode to produce both the CFM and Mach-O versions of the shim.

The biggest advantage to this approach is that your user interface and processing code is independent of the glue code that passes data back and forth to the host application. You could, for example, easily adapt the “plug-in” part to work with Aperture’s new plug-in architecture and not have to worry about 99% of the rest of the code. We take this approach with our IconBuilder product: PS7 and CS3 have slightly different plug-in specifications, so we offer two plug-ins that use the same UI/processing bundle.

Another advantage to this approach is that you can do testing without having to run under the host application. I use a small test harness that loads the UI/processing bundle and feeds it data. This makes it much simpler to work in a debugger without the host application getting in the way. You could also use a similar technique to build a standalone application.

Finally, there’s much better documentation than when I figured all this stuff out. Here’s something at ADC that will help get you started.